There’s a unique satisfaction in taking a raw piece of timber and revealing the beautiful vessel hidden within. Bowl turning, a captivating discipline within the broader craft of Woodturning, is exactly that – a blend of technical skill, artistic vision, and a deep connection with the wood itself. It’s a journey that starts long before the lathe spins, involving careful selection of materials and tools, and culminates in a functional or purely aesthetic piece that carries the imprint of both the maker and the tree it came from. Whether you’re just starting out or looking to refine your techniques, this exploration covers the essential steps and considerations for creating stunning wooden bowls, drawing from years of hands-on experience and the wisdom shared within the turning community.
Preparing for the turn: Wood, tools, and safety
The character of your finished bowl begins with the wood itself. While almost any wood can be turned, beginners often find more success starting with moderately hard, even-textured timbers like maple, ash, or cherry, as suggested in guides for starting your first bowl project. These woods tend to cut cleanly and hold detail well. Understanding grain orientation is crucial; unlike spindle turning where the grain runs parallel to the lathe bed, bowl turning typically involves face grain work, where the grain runs perpendicular. This means the tool encounters varying grain directions with each rotation, demanding careful technique. I’ve found that truly understanding how wood moves, especially green (wet) wood which shrinks and potentially warps as it dries, is fundamental. Embracing sustainable sourcing, perhaps using wood from storm-fallen trees or local arborists as described in one artist’s journey from fallen tree to finished piece, adds another layer of connection to the process.
Your primary partner in bowl turning is the lathe. For bowls of significant size, a heavy, stable lathe, preferably with cast iron construction, is essential to dampen vibration. Variable speed control isn’t just a luxury; it’s vital for safely starting irregularly shaped blanks at low RPMs and finding the ‘sweet spot’ as the piece becomes balanced. Good low-end torque is also important, especially for initial roughing cuts. Beyond the lathe, secure workholding is key – scroll chucks gripping a tenon or faceplates screwed directly to the blank are common methods. The star tool is undoubtedly the bowl gouge, with its deep flute designed for efficiently removing material and shaping curves. Hollowing tools and scrapers also play important roles, especially for deeper vessels or refining surfaces. And never underestimate the importance of sharp tools; they are safer, require less effort, and produce far superior results. Keeping your tools honed isn’t just good practice, it’s essential.
Safety first: Non-negotiables at the lathe
Woodturning is immensely rewarding, but it carries inherent risks. Over my years in the workshop, I’ve seen the consequences of carelessness, which reinforces my belief that safety must always be the top priority. Always wear appropriate personal protective equipment (PPE). A full face shield is highly recommended over just safety glasses to protect against flying debris. Respiratory protection is crucial, especially when sanding or working with woods known to cause reactions. Avoid loose clothing, tie back long hair, and remove any jewelry that could get caught. Before starting the lathe, double-check that the workpiece, tool rest, and tailstock (if used) are securely locked down. Always stand to the side of the rotating blank’s ‘firing line’. Start the lathe at its lowest speed and gradually increase it as the piece becomes balanced. Inspect your wood blank for cracks or inclusions that could cause it to fail under rotational stress. Specific situations bring unique hazards; for instance, when turning deep bowls, be mindful of keeping your knuckles clear of the spinning wood near the opening to avoid friction burns or cuts.
Mastering the fundamentals: Shaping the exterior and interior
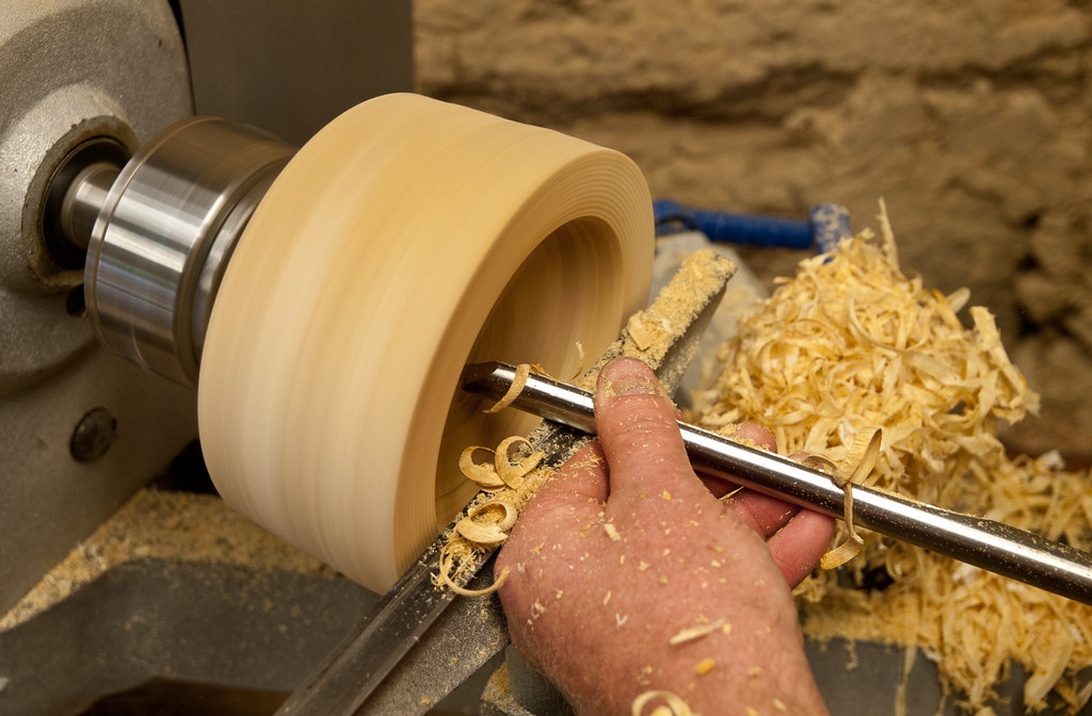
Once the blank is securely mounted, the shaping begins. The exterior profile is typically turned first. I generally work from a smaller diameter towards a larger one, for instance, from the base towards the rim. Roughing cuts, often made with the bowl gouge held fairly horizontally, remove waste material quickly. As the blank becomes round, you can refine the shape using techniques like the push cut or the pull/shear cut, where the tool slices the wood fibres for a cleaner finish. Pay attention to the ‘ABC’s of turning – Anchor the tool, find the Bevel contact, and make the Cut. Riding the bevel, ensuring the tool’s ground edge behind the cutting edge is gliding against the wood, provides support and control for smooth, flowing curves. Achieving those pleasing lines that define a beautiful bowl often comes down to careful tool control and understanding how the tool interacts with the wood.
The geometry of your cutting edge significantly impacts the cut. While specific tool types matter, I believe understanding the principles behind the edge is more important. Factors like the cutting angle and, particularly for finishing cuts, the side rake (the angle of the edge relative to the direction of the cut) are critical. You can find advanced insights into tool geometry and presentation that delve deeper into optimizing these angles for efficiency and finish quality. Experimenting with how you present the gouge’s flute – open or closed relative to the wood – also changes the cutting action. Learning to use different parts of the gouge’s wing allows for versatile shaping, from broad curves to tighter details.
Hollowing techniques: Bringing the bowl to life
Hollowing transforms the shaped blank into a vessel. The process often starts near the rim and works inwards and downwards towards the center. Similar cutting principles apply as for the exterior, typically working from larger to smaller diameters inside the bowl. For efficient removal of bulk material, especially in production settings, some turners use coring systems which can yield smaller bowls from the interior waste wood. However, standard bowl gouges are perfectly capable. As you work deeper, maintaining consistent wall thickness becomes crucial. I often use calipers, including specialized plywood ones that can measure while the lathe is stopped, or simply shine a bright light through the wall (on thinner pieces) to gauge thickness visually. Taking lighter cuts as you approach the final thickness helps maintain control.
Turning the inside presents unique challenges. Reaching deep into a vessel requires longer tool handles for leverage and potentially specialized hollowing tools or longer tool rests to provide adequate support near the cutting edge. The transition curve from the side wall to the bottom can be tricky; sometimes a shear scraping technique with a scraper or specially ground gouge is needed for a smooth finish. When dealing with concave surfaces inside the bowl, using a gouge with a convex bevel, rather than flat or hollow ground, can prevent the ‘heel’ of the bevel from bruising the wood fibres, allowing for cleaner cuts. Minimizing issues like tear-out (where fibres get ripped out) often involves ensuring tools are razor sharp and potentially adjusting the angle of presentation, especially when cutting across end grain sections.
Handling wood movement: The art of green turning and drying
One of the fundamental choices in bowl turning is whether to work with green (wet) wood or dry wood. Green wood cuts like butter, producing satisfying ribbons and minimal dust. However, it contains a lot of moisture and will inevitably shrink and potentially distort as it dries. Some turners embrace this movement, turning the bowl to its final thickness while green and letting it warp into a unique, organic shape. Applying an oil finish can help slow the drying slightly, but careful shaping with consistent wall thickness is key to minimizing cracking.
The more common approach, especially for functional bowls or when predictable shapes are desired, is the ‘twice-turned’ method. Here, you rough-turn the bowl from green wood, leaving the walls intentionally thick – a general guideline is about 10% of the bowl’s diameter. This ‘roughout’ is then set aside to dry slowly and stabilize. As it dries, it will likely go oval or warp. Once the wood reaches a stable moisture content (often checked by weighing it periodically until the weight loss plateaus), it’s remounted on the lathe and turned a second time to its final, perfectly round shape and desired wall thickness.
Drying strategies for success
Successfully drying rough-turned bowls without catastrophic cracking requires controlling the rate of moisture loss, particularly from the end grain which dries much faster than face grain. There are several effective strategies for managing wood movement during drying. A popular and inexpensive method is to place the roughouts in paper bags or wrap them in kraft paper, changing the paper periodically if it becomes damp. Another common approach is coating the roughout with a wax emulsion sealant designed to slow moisture evaporation. Packing roughouts loosely in a cardboard box filled with the shavings produced during turning also works well, creating a self-insulating environment. Regardless of the method, regular inspection is wise, especially during the initial drying phase. Small cracks (‘checks’) can sometimes be stabilized with cyanoacrylate (CA) glue if caught early. Patience is key; proper drying can take several months to a year, depending on the wood species, thickness, and ambient conditions.
Refining and finishing: The final touches
While the goal is often to achieve a finish smooth enough directly from the tool, sanding is usually necessary to refine the surface. Power sanding on the lathe is efficient, but requires a light touch to avoid creating ridges or flat spots. I typically start with a grit around 120 or 180 after a clean cut, progressing through finer grits (220, 320, sometimes 400 or higher) until the desired smoothness is achieved. It’s important to stop the lathe frequently and sand by hand in the direction of the grain to remove any cross-grain scratches left by power sanding. For burls or highly figured woods, sanding meticulously to higher grits really brings out the depth and chatoyance.
Once the main body of the bowl is shaped and sanded, attention turns to the base. If you used a tenon for chucking, it needs to be removed. This is often done by reverse-chucking the bowl. One method involves creating a dedicated jam chuck – a waste block mounted on the lathe with a recess turned to snugly fit the rim of the bowl. Padded with foam or cloth to protect the rim, the bowl is held in place by pressure from the tailstock, allowing access to refine the base and remove the tenon. Vacuum chucks offer another professional solution. Alternatively, methods like using a ‘doughnut’ jig or carefully applied hot melt glue to a support block can hold the bowl securely for final base work.
Choosing and applying the right finish
The finish protects the wood and enhances its appearance. For bowls intended for food use, choose a food-safe finish like pure tung oil, walnut oil, mineral oil, or specialized food-safe blends. For decorative bowls, options expand to include oil/varnish blends (like Danish oil), shellac, or lacquer. I find oil finishes particularly satisfying as they soak into the wood, giving it a rich, natural lustre. The first coat of oil is often a magical moment, revealing the grain’s depth and colour. Application is often done with the lathe stopped or turning very slowly, wiping on the finish and then buffing off any excess. Multiple thin coats are usually better than one thick coat. Burnishing the final coat with shavings or a soft cloth while the lathe spins slowly can create a beautiful, tactile sheen.
Expanding your horizons: Specialized bowl turning techniques
Once you’re comfortable with the basics, the world of bowl turning opens up further. Tackling deep bowls, for example, requires careful tool control near the bottom and often necessitates longer tool rests or specialized hollowing systems to maintain stability and reach. Safety becomes even more critical due to the confined space.
Working with challenging materials like burls offers unique rewards. Burls, with their wild, swirling grain, require careful preparation, often starting with balancing the irregular shape between centers. Techniques like using shearing cuts and maintaining sharp tools are vital to avoid tear-out in the unpredictable grain. Finishing burl often involves meticulous sanding and perhaps subtle embellishments like carving or pyrography to highlight, not overwhelm, the natural patterns.
Turning large bowls pushes the limits of both equipment and technique. A heavy lathe with variable speed and plenty of torque is essential. Techniques like starting with scrapers to manage initial imbalances, using reverse turning for better ergonomics when hollowing, and potentially utilizing lathe bed extensions become part of the process.
Exploring natural edge bowls allows you to incorporate the tree’s original outer surface, including bark, into the rim design. This often involves working with green wood and embracing the asymmetry that results from the natural shape and drying process, creating pieces that speak strongly of their origins.
The ongoing journey of a bowl turner
Mastering bowl turning isn’t a destination, but a continuous journey of learning and refinement. Each piece of wood is different, presenting new challenges and opportunities. Practice, careful observation of how the tool cuts, and a willingness to experiment are your greatest assets. In my experience, some of the best lessons come from mistakes – understanding why a catch happened or how a certain cut went wrong deepens your understanding. There’s immense satisfaction in developing the skill to translate the vision in your mind, or the potential you see in a log, into a tangible, beautiful object. Don’t hesitate to share your work and learn from others by engaging with the wider woodturning community – it’s a fantastic resource for inspiration and troubleshooting.
Beyond the techniques and the tools, there’s a deeper connection formed when working with wood. The focus required can be almost meditative, quieting the mind as shavings peel away to reveal the form within. It’s a craft that demands respect for the material and encourages a measure of environmental awareness – perhaps even inspiring us, as some suggest, to give back by planting trees. So, keep turning, keep learning, and keep discovering the endless beauty held within a simple piece of wood. The potential for creation is limited only by your imagination and your willingness to explore.